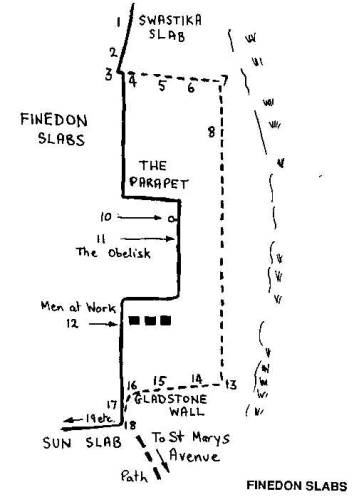
Finedon Slabs Routes |
|
|
Finedon Slabs Grace Dieu Viaduct and
Craglets |
THE CLIMBS From the
bottom, facing the Slabs, on the far left of SWASTIKA SLAB is: 1
Swastlka 7m VS 4c
(Swastika Slab) The
centre of the teft wall. Move up on small holds and gain a horizontal crack
by an awkward mantleshelf. Toe traverse right and finish up the layback crack
(Orchard Crack). P. and S.
Roberts, 1970's. 2
Hitler 6m HVS 6a (Swastika Slab) Replaces
Milner Road. Climb the wall 2m right of Swastika on small holds to the crack
at half height. Two holds on the slab above lead to the top. F. Ball,
1984. 3
Orchard Crack 5m 3c (Swastika Slab) The
obvious layback crack. 4 The
UFO has Landed 5m 5b (Swastika Slab) A micro-route
just right of Orchard Crack. Needs a blinkered approach. F. Ball, 1984. 5 Down Under 5m 5b (Swastika Slab) The slab
to the right. F. Ball, 1983. 6 Love Over Gold 5m 6a (Swastika Slab) The slab
just left of the corner with a very fierce mantleshelf half way. Fraser
Ball, 1983. The NORTH
WALL boasts: 7
Cresta Run 5m 4b (Swastika Slab) At the left-hand
end of the wall is a corner with a thin crack. Use it, and luck, to reach the
top. Fun. 8
Dolben Arms 9m VS 4c * Start 5m
right of Cresta Run. Climb the wall using the three pockets. From the top
foothold reach back to the roof and escape left. Or, alternatively, traverse
right, across the slab, via the square holes (5a). 9
Bully 9m 5b A boulder
problem. Up Dolben Arms until a traverse right to Obelisk Rise can be made
using the foothold. 10
Obelisk Rise 9m E1 5c * Take the
slab on the left of the two pillars until a traverse right using the square
holes can be made to join The Obelisk at the cross-beam. Climb this until a
swinging traverse back left can be made using the two ring bolts and the six
holes in the beam. Finish at the corner. Very pumping. F. Bell
and G. Leonard, 1983.
11 The Obelisk 9m HVS 5a * The column to the right. Climb up to the crossbar and then bridge up until a sensationally exposed swing on to the face of the column can be made (crux). Pull up strenuously on two fingerholds and mantleshelf. Protectable. M. Bradley and C. Robinson, 1970's. 12 Men
at Work 9m E2 6a ** Climb the
two pillars to the right of The Obelisk by back and foot until an awkward
position under the roof is gained. Back and foot out leftwards to place a No.
2 Friend in the lower of the three holes. Place a long (6ft) sling and return
to the cross-beam. Clasp the sling and swing to a standing position. Free
climb to the lip using the three holes in the roof and make an awkward move
to finish. Brilliant. F. Ball,
1983. 13
Mulso Arms 5m 3c (Gladstone Wall) Climb the
right-hand corner of the North Wall. A natural drain. 14
Down in the Sewer 5m 4c (Gladstone Wall) Just
right of Mulso Arms. Wet and hideous. 15
Gladstone Wall 5m 4b (Gladstone Wall) Climb the
centre of the wall on thin holds. Using the ironwork reduces the difficulty. 16 Spectra 5m 4c (Gladstone Wall) The small
arête to the right. Hard to start but easier higher up. 17
Pulsar 5m 5a (Gladstone Wall) Climb the
centre of the next short wall on microscopic holds to the crack. Mantleshelf
to finish. 18
Easy Street 5m 1c (Gladstone Wall) (Sun
Slab) The easy
corner to the right. A good way down. On SUN
SLAB there is: 19
Telegraph Road 9m HVS 5c (Sun Slab) Climb the
slab right of Easy Street. Delicate and good. F. Ball,
1983. 20
Shoot the Moon 9m HVS 6a (Sun Slab) Climb the
slab just left of the obvious crack (Quasar) to gain a standing position in the
horizontal crack. Take the slab above by the two enormously spaced holds.
Harder if you are under 6 foot. F. Ball,
1984. 21
Quasar 9m VD 3c (Sun Slab) Climb the
obvious wide crack on jams and laybacks. P. and S. Roberts. 1970's. 22
Redshift 9m HVS 5b (Sun Slab) Start 1m
right of Quasar. Move up on a small knobble and make an awkward move into the
crack. Two toeholds complete this delicate route. Was once pegged. C.
Robinson and M. Bradley, 1970's. 23
Stairway to Heaven 13m HVS 5c Climb the
slab right of Redshift. Traverse left at half height to Quasar. Up this until
a traverse leftwards using the numerous pockets can be made. 24 Polly 13m HVS 5c * (Sun Slab) Climb the slab just left of the arête (Blueshift) to the crack at half height. Gain the crack (no using the arête) and traverse left until a line of holds up the slab is reached. F. Ball, 1983. 25
Blueshlft 9m VS 4b * (Sun Slab) Take the
arête direct to the top. Strenuous and serious. P. and S.
Roberts, 1970's. 26
Hammerhead 9m E1 5b (Sun Slab) Climb the
slab to the right of the arête (Blueshift) on the manufactured holds. No more
of this, please. F. Ball,
1984. 27
Glrdle Traverse 35m HVS 5c Start up
Blueshift and climb to the toe traverse of Polly which is followed to the
corner of East Street Traverse across Pulsar using the crack and round the arête
of Spectra. Move across Gladstone Wall to Mulso Arms and traverse under The
Parapet to finish up Cresta Run. C. Robinson, 1978. |